
Spring boot 入门学习14.若依框架自定义模块配置项
Spring boot 入门学习14.若依框架自定义模块配置项一、 若依类库结构二、配置项1. RuoYiApplication 添加扫描类2. application.yml 设置mybatis3. 修改 ruoyi-framework下的ApplicationConfig三、其它设置1. application.yml设置xxs2. 日志设置 application.yml里3.logback
·
Spring boot 入门学习14.若依框架自定义模块配置项
一、 若依类库结构
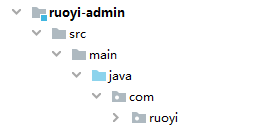
若要自己新加模块,如: com.abc,进行以下配置。
二、配置项
1. RuoYiApplication 添加扫描类
@SpringBootApplication(exclude = { DataSourceAutoConfiguration.class })
@ComponentScan(basePackages = {"com.ruoyi","com.abc"})
public class RuoYiApplication
{
2. application.yml 设置mybatis
# MyBatis配置
mybatis:
    # 搜索指定包别名
    typeAliasesPackage: com.ruoyi.**.domain,com.abc.**.domain
    # 配置mapper的扫描,找到所有的mapper.xml映射文件
    mapperLocations: classpath*:mapper/**/*Mapper.xml
    # 加载全局的配置文件
    configLocation: classpath:mybatis/mybatis-config.xml
3. 修改 ruoyi-framework下的ApplicationConfig
@Configuration
// 表示通过aop框架暴露该代理对象,AopContext能够访问
@EnableAspectJAutoProxy(exposeProxy = true)
// 指定要扫描的Mapper类的包的路径
@MapperScan({"com.ruoyi.**.mapper","com.abc.**.mapper"})
public class ApplicationConfig
{
    /**
     * 时区配置
     */
    @Bean
    public Jackson2ObjectMapperBuilderCustomizer jacksonObjectMapperCustomization()
    {
        return jacksonObjectMapperBuilder -> jacksonObjectMapperBuilder.timeZone(TimeZone.getDefault());
    }
}
三、其它设置
1. application.yml设置xxs
# 防止XSS攻击
xss:
  # 过滤开关
  enabled: true
  # 排除链接(多个用逗号分隔)
  excludes: /system/notice/*
  # 匹配链接
  urlPatterns: /system/*,/monitor/*,/tool/*,/abc/*
2. 日志设置 application.yml里
# 日志配置
logging:
  level:
    com.ruoyi: debug
    com.abc: debug
    org.springframework: warn
3.logback.xml设置
	<!-- 系统模块日志级别控制  -->
	<logger name="com.ruoyi" level="info" />
    <logger name="com.abc" level="info" />
	<!-- Spring日志级别控制  -->
	<logger name="org.springframework" level="warn" />

快速构建 Web 应用程序
更多推荐


 2
2 0
0- 0


 已为社区贡献2条内容

所有评论(0)