
若依前后分离版框架下Springboot java引入Mqtt接受发送消息
同步机制还要跟搞物联网的同事沟通确认去看看能不能实现 或者是设备比较多的情况下 不会去使用同步机制。**再创建一个继承回调方法的接口 PushCallback。先创建一个yml文件的实体类 MqttConfig。**这里在创建 MqttPushClient 文件。**到这里的话 接受消息就完事了 就要搞下发消息了。随便找个controller弄个请求搞一下 **去链接客户端、发消息、订阅主题 功能
这只是其中一种而且是粗浅的接、发消息。
同步机制还要跟搞物联网的同事沟通确认去看看能不能实现 或者是设备比较多的情况下 不会去使用同步机制
首先pom文件 引入依赖
        <dependency>
            <groupId>org.eclipse.paho</groupId>
            <artifactId>org.eclipse.paho.client.mqttv3</artifactId>
            <version>1.2.5</version>
        </dependency>
其次配置文件mqtt配置,我这是yml,其他配置文件写法需要改动下
mqtt:
    username: ****** # 用户名
    password: ****** # 密码
    hostUrl: tcp://******:1883 # tcp://ip:端口
    clientId: clientId # 客户端id
    defaultTopic: electric/#,test # 订阅主题  electric/#表示以electric/开头的主题都可以接受到
    timeout: 100 # 超时时间 (单位:秒)
    keepalive: 60 # 心跳 (单位:秒)
    enabled: true # 是否使用mqtt功能
接下来到了代码层面了
先创建一个yml文件的实体类 MqttConfig
prefix = 这里地址看你自己的配置
@ConfigurationProperties(prefix = “mqtt”)
import com.ruoyi.common.utils.StringUtils;
import org.springframework.beans.factory.annotation.Autowired;
import org.springframework.boot.context.properties.ConfigurationProperties;
import org.springframework.context.annotation.Bean;
import org.springframework.stereotype.Component;

@Component
@ConfigurationProperties(prefix = "mqtt")
public class MqttConfig {
    @Autowired
    private MqttPushClient mqttPushClient;

    /**
     * 用户名
     */
    private String username;
    /**
     * 密码
     */
    private String password;
    /**
     * 连接地址
     */
    private String hostUrl;
    /**
     * 客户Id
     */
    private String clientId;
    /**
     * 默认连接话题
     */
    private String defaultTopic;
    /**
     * 超时时间
     */
    private int timeout;
    /**
     * 保持连接数
     */
    private int keepalive;
    /**
     * mqtt功能使能
     */
    private boolean enabled;
    private boolean retained;
    /**
     * qos
     */
    private int qos;

    public String getUsername() {
        return username;
    }

    public void setUsername(String username) {
        this.username = username;
    }

    public String getPassword() {
        return password;
    }

    public void setPassword(String password) {
        this.password = password;
    }

    public String getHostUrl() {
        return hostUrl;
    }

    public void setHostUrl(String hostUrl) {
        this.hostUrl = hostUrl;
    }

    public String getClientId() {
        return clientId;
    }

    public void setClientId(String clientId) {
        this.clientId = clientId;
    }

    public String getDefaultTopic() {
        return defaultTopic;
    }

    public void setDefaultTopic(String defaultTopic) {
        this.defaultTopic = defaultTopic;
    }

    public int getTimeout() {
        return timeout;
    }

    public void setTimeout(int timeout) {
        this.timeout = timeout;
    }

    public int getKeepalive() {
        return keepalive;
    }

    public void setKeepalive(int keepalive) {
        this.keepalive = keepalive;
    }

    public boolean isEnabled() {
        return enabled;
    }

    public void setEnabled(boolean enabled) {
        this.enabled = enabled;
    }
    public int getQos() {
        return qos;
    }

    public void setQos(int qos) {
        this.qos = qos;
    }


    @Bean
    public MqttPushClient getMqttPushClient() {
        if(enabled == true){
            String mqtt_topic[] = StringUtils.split(defaultTopic, ",");
            mqttPushClient.connect(hostUrl, clientId, username, password, timeout, keepalive);//连接
            for(int i=0; i<mqtt_topic.length; i++){
                mqttPushClient.subscribe(mqtt_topic[i], 0);//订阅主题
            }
        }
        return mqttPushClient;
    }
}
**这里在创建 MqttPushClient 文件
去链接客户端、发消息、订阅主题 功能都在这里
**
import org.eclipse.paho.client.mqttv3.*;
import org.eclipse.paho.client.mqttv3.persist.MemoryPersistence;
import org.slf4j.Logger;
import org.slf4j.LoggerFactory;
import org.springframework.beans.factory.annotation.Autowired;
import org.springframework.stereotype.Component;


@Component
public class MqttPushClient {
    private static final Logger logger = LoggerFactory.getLogger(MqttPushClient.class);

    @Autowired
    private PushCallback pushCallback;

    private static MqttClient client;

    private static MqttClient getClient() {
        return client;
    }

    private static void setClient(MqttClient client) {
        MqttPushClient.client = client;
    }

    /**
     * 客户端连接
     *
     * @param host      ip+端口
     * @param clientID  客户端Id
     * @param username  用户名
     * @param password  密码
     * @param timeout   超时时间
     * @param keepalive 保留数
     */
    public void connect(String host, String clientID, String username, String password, int timeout, int keepalive) {
        MqttClient client;
        try {
            client = new MqttClient(host, clientID, new MemoryPersistence());
            MqttConnectOptions options = new MqttConnectOptions();
            options.setCleanSession(true);
            options.setUserName(username);
            options.setPassword(password.toCharArray());
            options.setConnectionTimeout(timeout);
            options.setKeepAliveInterval(keepalive);
            MqttPushClient.setClient(client);
            try {
                client.setCallback(pushCallback);
                client.connect(options);
            } catch (Exception e) {
                e.printStackTrace();
            }
        } catch (Exception e) {
            e.printStackTrace();
        }
    }

    /**
     * 发布消息
     *
     * @param pubTopic 主题
     * @param message 内容
     * @param qos   连接方式
     */
    public  static void publishMessage(String pubTopic, String message, int qos) {
            System.out.println("发布消息   "+client.isConnected());
            System.out.println("id:"+client.getClientId());
            MqttMessage mqttMessage = new MqttMessage();
            mqttMessage.setQos(qos);
            mqttMessage.setPayload(message.getBytes());

            MqttTopic topic = client.getTopic(pubTopic);

            if(null != topic) {
                try {
                    MqttDeliveryToken publish = topic.publish(mqttMessage);
                    if(!publish.isComplete()) {
                        logger.info("发布消息成功");
                    }
                } catch (MqttException e) {
                    e.printStackTrace();
                }
            }
    }

    /**
     * 订阅某个主题
     *
     * @param topic 主题
     * @param qos   连接方式
     */
    public static void subscribe(String topic, int qos) {
        logger.info("开始订阅主题" + topic);
        try {
            MqttPushClient.getClient().subscribe(topic, qos);
        } catch (MqttException e) {
            e.printStackTrace();
        }
    }

}
再创建一个继承回调方法的接口 PushCallback
package com.ruoyi.util.mqttUtil;

import com.alibaba.fastjson2.JSONObject;
import org.eclipse.paho.client.mqttv3.IMqttDeliveryToken;
import org.eclipse.paho.client.mqttv3.MqttCallback;
import org.eclipse.paho.client.mqttv3.MqttClient;
import org.eclipse.paho.client.mqttv3.MqttMessage;
import org.slf4j.Logger;
import org.slf4j.LoggerFactory;
import org.springframework.beans.factory.annotation.Autowired;
import org.springframework.stereotype.Component;

@Component
public class PushCallback implements MqttCallback {
    private static final Logger logger = LoggerFactory.getLogger(MqttPushClient.class);

    @Autowired
    private MqttConfig mqttConfig;

    private static MqttClient client;

    private static String _topic;
    private static String _qos;
    private static String _msg;

    @Override
    public void connectionLost(Throwable throwable) {
        // 连接丢失后,一般在这里面进行重连
        logger.info("连接断开,可以做重连");
        if (client == null || !client.isConnected()) {
            mqttConfig.getMqttPushClient();
        }
    }

    @Override
    public void messageArrived(String topic, MqttMessage mqttMessage) throws Exception {
        // subscribe后得到的消息会执行到这里面
        logger.info("接收消息主题 : " + topic);
        logger.info("接收消息Qos : " + mqttMessage.getQos());
        logger.info("接收消息内容 : " + new String(mqttMessage.getPayload()));

        _topic = topic;
        _qos = mqttMessage.getQos()+"";
        _msg = new String(mqttMessage.getPayload());
    }

    @Override
    public void deliveryComplete(IMqttDeliveryToken iMqttDeliveryToken) {
        logger.info("发布消息成功");
        //发布消息成功之后 才会调用这里 大家可以仔细看看token里面 后续同步机制也是利用这个token去完成
        logger.info("deliveryComplete---------" + iMqttDeliveryToken.isComplete());
    }

    //别的Controller层会调用这个方法来  获取  接收到的硬件数据
    public String receive() {
        JSONObject jsonObject = new JSONObject();
        jsonObject.put("topic", _topic);
        jsonObject.put("qos", _qos);
        jsonObject.put("msg", _msg);
        return jsonObject.toString();
    }

}
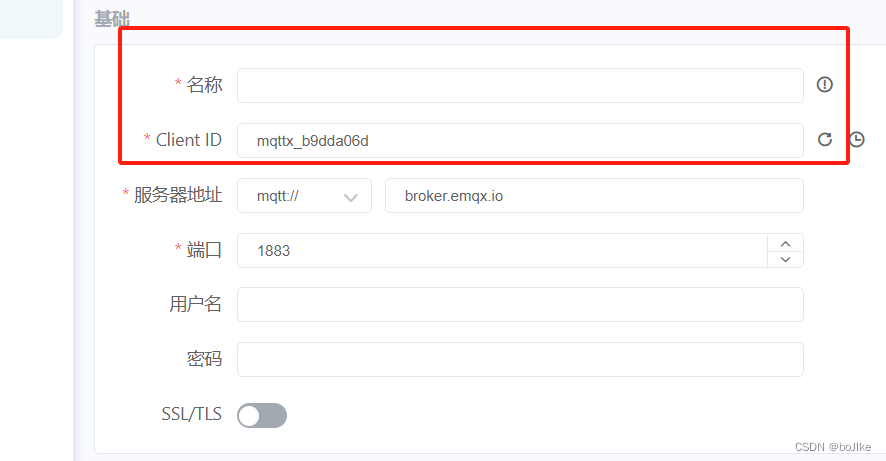
到这就需要去下载个 MQTTX 跟服务器直接互相接发消息了
下图红框内的随意填写 服务器地址、端口、用户名、密码使用java代码配置文件里面的


往下就是连接上 添加一个订阅,记得 这个订阅要在你在配置文件里面哦 什么名字都ok /#相当于模糊查询

好了 这里可以启动项目了 控制台会打印咱们订阅的主题的,也就是说这些主题给咱们发消息 会直接被咱们接受的

启动项目 由于咱们的配置文件里订阅了test这个主题 我在mqttx里面直接给 test这个主题发送信息

控制台自动打印 订阅的test主题信息

**到这里的话 接受消息就完事了 就要搞下发消息了
随便找个controller弄个请求搞一下 **
    @RequestMapping("/send")
    @ResponseBody
    private ResponseEntity<String> send() throws MqttException {
       System.out.println("我是springboot发送的数据");
       //三个参数 第一个是什么主题,第二个发送内容,第三个是qos
        MqttPushClient.publishMessage("clientId1","-===============",1);
        return new ResponseEntity<>("OK", HttpStatus.OK);
    }


已分享完毕,只是很基础的应用 另过几天如果项目有需求会在这继续完善同步mqtt请求的后续 如果接受不到消息 一定要看看订阅的主题对应起来没

快速构建 Web 应用程序
更多推荐
 0
0 0
0- 0


 已为社区贡献2条内容

所有评论(0)