若依Cloud集成Flowable6.7.2
基于若依Cloud的Jove-Fast微服务项目,集成工作流flowable(接上篇文章)若依Cloud集成积木报表项目地址。
·
项目简介
基于若依Cloud的Jove-Fast微服务项目,集成工作流flowable(接上篇文章)
若依Cloud集成积木报表
项目地址:https://gitee.com/wxjstudy/jove-fast
后端
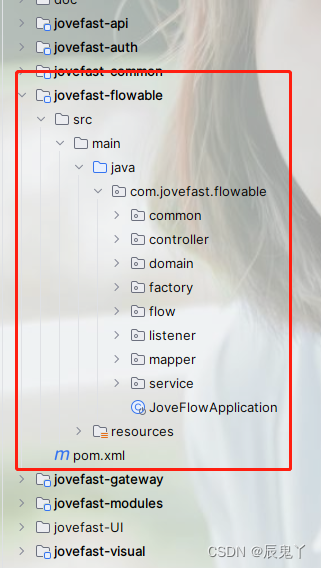
新建模块
目录结构如下:

引入依赖
前提:引入依赖之前先配置好maven的setting.xml
<mirror>
       <id>nexus-aliyun</id>
            <mirrorOf>*,!jeecg,!jeecg-snapshots,!getui-nexus</mirrorOf>
            <name>Nexus aliyun</name>
            <url>http://maven.aliyun.com/nexus/content/groups/public</url>
        </mirror>
再看pom.xml核心内容
		<dependency>
			<groupId>org.flowable</groupId>
			<artifactId>flowable-spring-boot-starter-basic</artifactId>
			<version>${flowable.version}</version>
			<exclusions><!-- 需要排除flowable的mybatis依赖,不然会跟mybatis冲突 -->
				<exclusion>
					<groupId>org.mybatis</groupId>
					<artifactId>mybatis</artifactId>
				</exclusion>
			</exclusions>
		</dependency>
		<dependency>
			<groupId>org.flowable</groupId>
			<artifactId>flowable-engine</artifactId>
			<version>${flowable.version}</version>
			<scope>compile</scope>
		</dependency>
配置文件
nacos上的yml配置,命名为 xxx-flowable-dev.yml
# spring配置
spring:
  # 文件上传
  servlet:
     multipart:
       # 单个文件大小
       max-file-size:  20MB
       # 设置总上传的文件大小
       max-request-size:  400MB
  redis:
    host: 127.0.0.1
    port: 6379
    password: 123456
    database: 1
  datasource:
    dynamic:
      druid:
        #连接池初始化大小
        initial-size: 10
        #最大连接数
        max-active: 50
        #最小空闲连接数
        min-idle: 10
        max-wait: 60000
        # 申请连接时时候检测
        test-while-idle: true
        # 销毁线程时检测当前连接的最后活动时间和当前时间差大于该值时,关闭当前连接
        max-evictable-idle-time-millis: 60000
        # 毁线程时检测当前连接的最后活动时间和当前时间差大于该值时,关闭当前连接
        min-evictable-idle-time-millis: 40000
        # 检测是否是有效sql mysql 是 x oracle 是 select 1 from dual
        validation-query: select 1
        # 申请连接时会执行validationQuery检测连接是否有效,开启会降低性能,默认为true
        test-on-borrow: false
        # 归还连接时会执行validationQuery检测连接是否有效,开启会降低性能,默认为true
        test-on-return: false
        # 当数据库抛出不可恢复的异常时,抛弃该连接
        exception-sorter: true
        # 置访问druid监控页的账号和密码,默认没有
        stat-view-servlet:
          enabled: true
          url-pattern: /*
          exclusions: "*.js,*.gif,*.jpg,*.png,*.css,*.ico,/druid/*" #不统计这些请求数据
          stat-view-servlet: #访问监控网页的登录用户名和密码
            url-pattern: /druid/*
            reset-enable: false
            login-username: admin
            login-password: 123456
      datasource:
          # 主库数据源
          master:
            driver-class-name: com.mysql.cj.jdbc.Driver
            url: jdbc:mysql://127.0.0.1:3306/flowable-test?useUnicode=true&characterEncoding=utf8&zeroDateTimeBehavior=convertToNull&useSSL=true&serverTimezone=GMT%2B8&nullCatalogMeansCurrent=true
            username: root
            password: 123456
          # 从库数据源
          slave:
            driver-class-name: com.microsoft.sqlserver.jdbc.SQLServerDriver
            url: jdbc:sqlserver://127.0.0.1:1433;databasename=test
            username: admin
            password: 123456
      seata: false

# seata配置
seata:
  # 默认关闭,如需启用spring.datasource.dynami.seata需要同时开启
  enabled: false
  # Seata 应用编号,默认为 ${spring.application.name}
  application-id: ${spring.application.name}
  # Seata 事务组编号,用于 TC 集群名
  tx-service-group: ${spring.application.name}-group
  # 关闭自动代理
  enable-auto-data-source-proxy: false
  # 服务配置项
  service:
    # 虚拟组和分组的映射
    vgroup-mapping:
      jove-flowable-prod-group: default
  config:
    type: nacos
    nacos:
      serverAddr: 127.0.0.1:81
      group: SEATA_GROUP
      namespace: 457ea067-0192-4a23-baab-cc1bc538522b
  registry:
    type: nacos
    nacos:
      application: seata-server
      server-addr: 127.0.0.1:81
      namespace: 457ea067-0192-4a23-baab-cc1bc538522b


# mybatis配置
mybatis:
  configuration:
    # 超时单位为秒
    default-statement-timeout: 900
  # 搜索指定包别名
  typeAliasesPackage: com.jovefast.flowable
  # 配置mapper的扫描,找到所有的mapper.xml映射文件
  mapperLocations: classpath:mapper/**/*.xml
logging:
  level:
    com.jovefast.flowable.mapper: info

# swagger配置
swagger:
  title: 工作流中心模块接口文档
  license: Powered By xxx
  licenseUrl: https://xxx.com

# 暴露监控端点
management:
  endpoints:
    web:
      exposure:
        include: '*'
  endpoint:
    health:
      show-details: ALWAYS
    logfile:
      #可在线查看日志
      enabled: true
      external-file: logs/jove-flowable.log
模块克隆
直接将整个Flowable模块的引入到自己若依cloud项目中即可,代码在我的开源项目地址
https://gitee.com/wxjstudy/jove-fast
结束
好了,以上就是集成工作流flowable~
更多推荐
 已为社区贡献4条内容


所有评论(0)